Windows 11 Upgrade Guide for LASER Users
Overview
The LASER Virtual Machines (VMs) are now being upgraded to Windows 11.
All researcher VMs will be migrated from Windows 10 operating system to Windows 11. New Virtual Machines will be created with Windows 11 and the existing Windows 10 VMs will be taken offline. The Windows 10 VMs will be retained for up to two weeks before destruction.
When your TRE has migrated, the next time you log in to LASER Storefront you will be presented with the new VMs to choose from in place of the old.
Ensure no files are saved locally to C: or M: drives as these will be irrevocably lost when the Windows 10 VMs are destroyed.
All files and data should be saved to N: drive.
As part of this migration:
- Users will need to create or recreate their working environments.
- Software applications may need to be launched, configured, or reinstalled through AppsAnywhere.
- User-specific settings and local customisations from the previous Windows 10 VM may need to be recreated.
Project data has not been affected by the upgrade.
All project data stored on the project N: drive remains available and the existing project folder structure and file paths have not changed.
It is recommended that project data be stored on N: drive at all times, and avoid storing important project data on local VM desktop folders, or other local locations.
Accessing Software Using AppsAnywhere
Most approved software is available through AppsAnywhere.
Step 1 - Open AppsAnywhere
From your Windows 11 VM:
- Open the Browser.
- Navigate to https://appsanywhere.leeds.ac.uk/login.
- Launch the AppsAnywhere portal and login with your UoL credentials when prompted.
You should see the AppsAnywhere home page.

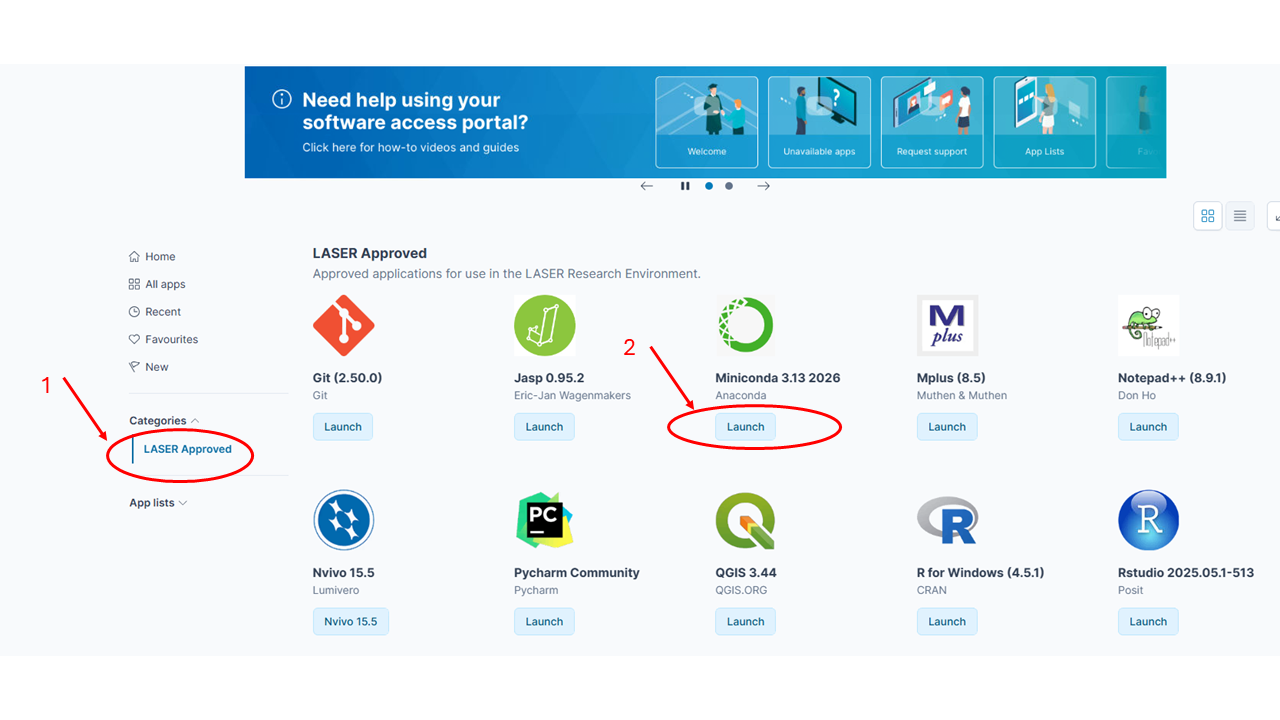
Step 2 - Navigate to LASER Approved Applications
From the left-hand menu:
- Select All Apps.
- Under Categories, select LASER Approved.
Only applications approved for use within the LASER are displayed. 
Step 3 - Launch an Application
Locate the software you require and select Launch.
The application will then:
- Download any required components (if needed).
- Configure the software.
- Start the application.
Some applications may take a few minutes to launch the first time they are used.
Step 4 - Configure Your Environment
Because this is a new Windows 11 environment, you may need to:
- Reconfigure software preferences.
- Set up Artificatory
- Recreate Python or Conda environments.
- Reinstall required packages and libraries.
- Reconfigure R packages.
If an Application is Unavailable
Some applications may display an Unavailable message.
Possible reasons include:
- The software requires additional approval.
- The software licence is restricted.
- The application is not available within the LASER environment.
- Additional prerequisites are required.
If the software is required for your research project, please contact the Data Analytics Team (dat@leeds.ac.uk).